> ## Documentation Index
> Fetch the complete documentation index at: https://docs.playbook3d.com/llms.txt
> Use this file to discover all available pages before exploring further.
# Unity SDK
Playbook's Unity SDK integrates the editor with ComfyUI. It allows you to quickly create and refine textures for your
scene using generative diffusion models.
[Get the Unity SDK](https://github.com/playbook3d/playbook3d-unity-sdk)
## Adding Playbook To Your Project
The Unity SDK only works on projects that are using the Universal Render
Pipeline. If your project is not using URP, you can add it by following this
guide: [Installing URP into an existing
Project](https://docs.unity3d.com/Packages/com.unity.render-pipelines.universal@7.1/manual/InstallURPIntoAProject.html)
Once you have your Unity project open, go to Window -> Package Manager. In the package manager, click the plus
icon on the top left and click "Add package from git URL...".
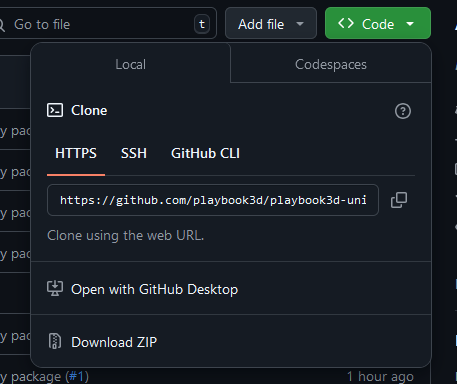
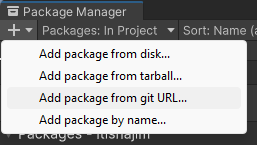 Enter the link provided by our repository: [Unity SDK](https://github.com/playbook3d/playbook3d-unity-sdk)
 Playbook is dependent on `SocketIOUnity`, so make sure to also add it to your project using the same steps as
before: [Socket IO Unity](https://github.com/itisnajim/SocketIOUnity)
## How To Use Playbook
To begin using Playbook, simply attach the `PlaybookSDK` component to your main camera.
Playbook is dependent on `SocketIOUnity`, so make sure to also add it to your project using the same steps as
before: [Socket IO Unity](https://github.com/itisnajim/SocketIOUnity)
## How To Use Playbook
To begin using Playbook, simply attach the `PlaybookSDK` component to your main camera.
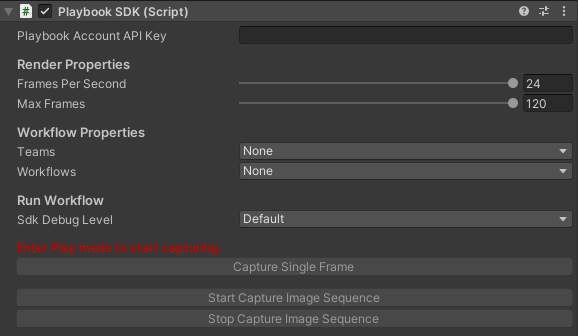 Add your Playbook API key in the `Playbook Account API Key` field. You can grab your API key from your
[Playbook](https://beta.playbook3d.com/) account.
Once you enter Play mode in Unity, the `Teams` and `Workflows` properties will be populated with your respective
teams and workflows. Select the ones you want to work with.
Note that you will need to exit and re-enter Play mode to refresh teams and workflows.
You can now start capturing a single frame or an image sequence by clicking the buttons.
You can check if your workflow was received by our servers by opening up the workflow you selected in the [Playbook Dashboard](https://beta.playbook3d.com).
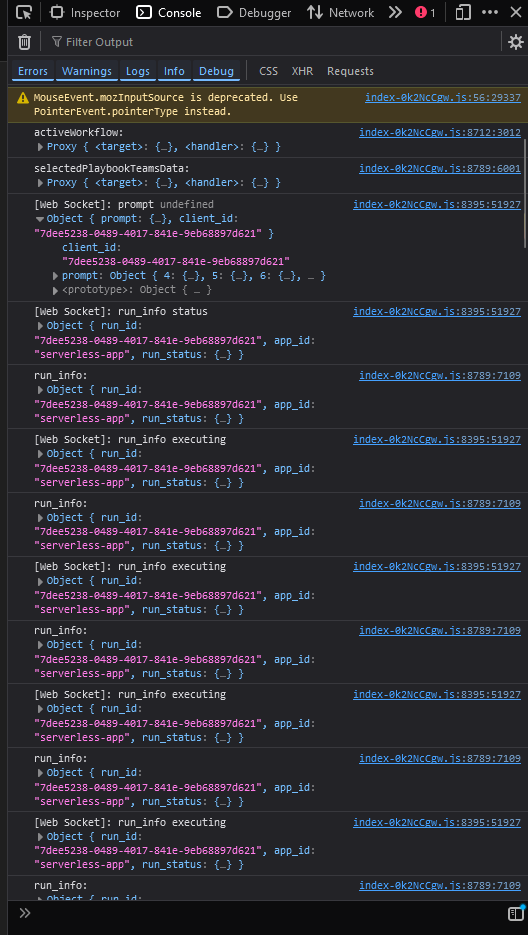
Open up your browser's console and you should receive a queued run:
Add your Playbook API key in the `Playbook Account API Key` field. You can grab your API key from your
[Playbook](https://beta.playbook3d.com/) account.
Once you enter Play mode in Unity, the `Teams` and `Workflows` properties will be populated with your respective
teams and workflows. Select the ones you want to work with.
Note that you will need to exit and re-enter Play mode to refresh teams and workflows.
You can now start capturing a single frame or an image sequence by clicking the buttons.
You can check if your workflow was received by our servers by opening up the workflow you selected in the [Playbook Dashboard](https://beta.playbook3d.com).
Open up your browser's console and you should receive a queued run:
 Once the render is complete, you'll find the URL to your image in the `PlaybookSDK` component. Copy this link,
paste it on your local internet browser, and your image will start downloading.
Once the render is complete, you'll find the URL to your image in the `PlaybookSDK` component. Copy this link,
paste it on your local internet browser, and your image will start downloading.
 ## Adding to Mask Pass
You can further customize your renders by manipulating the mask pass.
To add or remove GameObjects from mask groups, you can call the following methods:
GameObjects that do not have a `Renderer` component attached cannot be added
to a mask group.
```cs theme={"dark"}
// To add
PlaybookSDK.AddObjectToMaskGroup(GameObject maskObject, MaskGroup maskGroup);
PlaybookSDK.AddObjectsToMaskGroup(List maskObjects, MaskGroup maskGroup);
// To remove
PlaybookSDK.RemoveObjectFromMaskGroup(GameObject maskObject);
PlaybookSDK.RemoveObjectsFromMaskGroup(List maskObjects);
```
Additionally, you can also change the mask group of the background through these methods:
```cs theme={"dark"}
// To add
PlaybookSDK.SetBackgroundMaskGroup(MaskGroup maskGroup);
// To remove
PlaybookSDK.RemoveBackgroundMaskGroup();
```
Playbook supports up to 7 mask groups which are specified by the `MaskGroup`
property. `MaskGroup` also includes the "Catch-all" mask, which is the default
group for objects that are not part of a mask group.
## Listening to Results Received
To listen to workflow results when they are received, you can subscribe to `ResultReceived()` given in `PlaybookSDK.cs`, which returns the result as a url `string`.
```cs theme={"dark"}
private void OnEnable()
{
PlaybookSDK.ResultReceived += EventToDoWhenReceived;
}
private void OnDisable()
{
PlaybookSDK.ResultReceived -= EventToDoWhenReceived;
}
```
## Overriding Node Inputs
If you would like to manually override node inputs, you can do so by using `OverrideNodeInputs()`
given in `PlaybookSDK.cs`.
To call `OverrideNodeInputs()`, you must provide a dictionary on inputs to override the desired Playbook nodes in your selected workflow, where the `key` is the node ID and the `value` is the new value. For example:
```cs theme={"dark"}
Dictionary inputs = new Dictionary {
["11"] = "cats in outer space",
};
PlaybookSDK.OverrideNodeInputs(inputs);
```
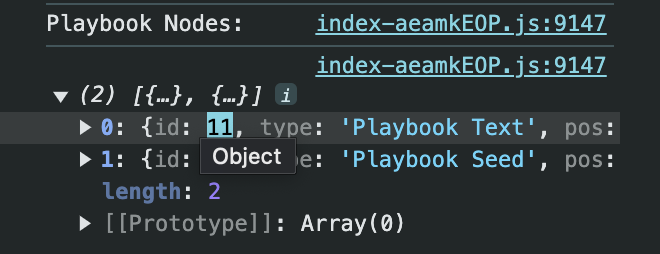
Dashboard display of node IDs per workflow is in progress. Currently, node IDs can be found by opening browser console in the [Playbook Dashboard](https://beta.playbook3d.com) and searching for `"Playbook Nodes:"`.
## Adding to Mask Pass
You can further customize your renders by manipulating the mask pass.
To add or remove GameObjects from mask groups, you can call the following methods:
GameObjects that do not have a `Renderer` component attached cannot be added
to a mask group.
```cs theme={"dark"}
// To add
PlaybookSDK.AddObjectToMaskGroup(GameObject maskObject, MaskGroup maskGroup);
PlaybookSDK.AddObjectsToMaskGroup(List maskObjects, MaskGroup maskGroup);
// To remove
PlaybookSDK.RemoveObjectFromMaskGroup(GameObject maskObject);
PlaybookSDK.RemoveObjectsFromMaskGroup(List maskObjects);
```
Additionally, you can also change the mask group of the background through these methods:
```cs theme={"dark"}
// To add
PlaybookSDK.SetBackgroundMaskGroup(MaskGroup maskGroup);
// To remove
PlaybookSDK.RemoveBackgroundMaskGroup();
```
Playbook supports up to 7 mask groups which are specified by the `MaskGroup`
property. `MaskGroup` also includes the "Catch-all" mask, which is the default
group for objects that are not part of a mask group.
## Listening to Results Received
To listen to workflow results when they are received, you can subscribe to `ResultReceived()` given in `PlaybookSDK.cs`, which returns the result as a url `string`.
```cs theme={"dark"}
private void OnEnable()
{
PlaybookSDK.ResultReceived += EventToDoWhenReceived;
}
private void OnDisable()
{
PlaybookSDK.ResultReceived -= EventToDoWhenReceived;
}
```
## Overriding Node Inputs
If you would like to manually override node inputs, you can do so by using `OverrideNodeInputs()`
given in `PlaybookSDK.cs`.
To call `OverrideNodeInputs()`, you must provide a dictionary on inputs to override the desired Playbook nodes in your selected workflow, where the `key` is the node ID and the `value` is the new value. For example:
```cs theme={"dark"}
Dictionary inputs = new Dictionary {
["11"] = "cats in outer space",
};
PlaybookSDK.OverrideNodeInputs(inputs);
```
Dashboard display of node IDs per workflow is in progress. Currently, node IDs can be found by opening browser console in the [Playbook Dashboard](https://beta.playbook3d.com) and searching for `"Playbook Nodes:"`.